Yoast SEO: Learn how to use the most popular WordPress SEO plugin

Yoast SEO is the best known WordPress SEO plugin of all, an SEO heavyweight, preferred by millions of users.
And it couldn’t be otherwise, Yoast includes a good handful of invaluable features to work on many aspects of your site’s SEO positioning.
In this tutorial we will talk about how to configure this powerful plugin and get the most out of it. This will be a step-by-step tutorial that will go from installation to some more advanced settings.
Here we go.
What is Yoast SEO?

Yoast SEO is an SEO plugin for WordPress that will help you adjust key elements of your site’s SEO, allowing you to easily optimize your site and improve its chances of achieving SEO.
Although WordPress streamlines the management of websites, it is not always as easy to configure certain factors that directly impact SEO; and that’s what the Yoast SEO plugin is designed for, to make your life easier and help you optimize your website without so many complications.

What does Yoast SEO do?
Yoast SEO is a plugin designed to help you optimize your site for SEO; allowing you to configure aspects that could be complex, and offering you specific recommendations.
However, it is important to clarify that Yoast SEO is not an SEO plugin; just because you use it does not mean that your website will rank better than others, nor does it even ensure that it will rank at all.

The recommendations and facilities it provides make it much easier to optimize your website for positioning, but it does not guarantee any kind of position in the SERPs.
Yoast SEO features
If anything has made Yoast stand out as an SEO plugin in such a competitive industry, it’s its numerous features, among them:
- Keyword optimization for your pages and posts.
- Easy configuration of Schema markup for your content.
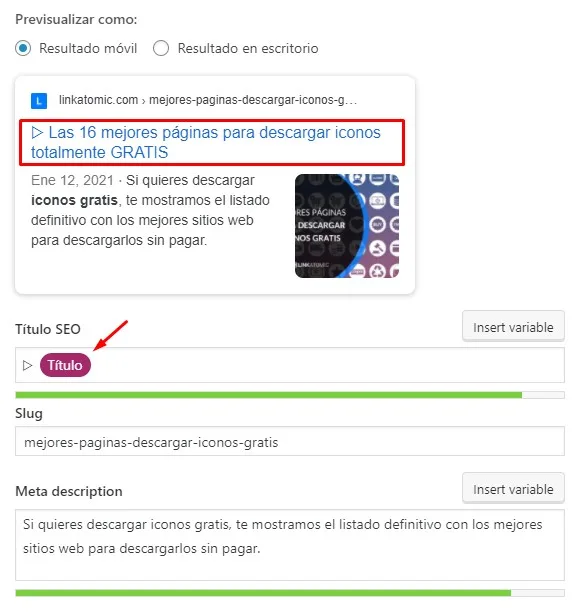
- Simple and easy title tag, meta description and URL editing through a snippet where you can preview how your content will look in the SERPs.
- An advanced readability section that will help you write more fluently and produce texts that are easier to read.
- Advanced structured data blocks, for those who use FAQs segments very often, for example.
- Easy configuration of breadcrumbs on your site.
- Compatibility with Gutenberg, the Classic Editor and the famous Elementor web layout tool.
- Simplified editing of the robots.txt and .htaccess file.
- Creation and management of the sitemap of your site, essential for your content to be indexed quickly and properly.
And these are just the basic functionalities of the free version of the plugin, which is not bad at all when you discover that each of them can help you improve your site’s SEO in the easiest possible way, saving you a lot of time and a lot of stumbling blocks.
Let’s see now how you can configure this plugin so you can start getting the most out of it.
How to configure Yoast SEO?
The first thing, of course, is to install Yoast on your site. Something that could not be easier. You can do it from WordPress itself, it’s as simple as looking for the Plugins section and clicking on the Add plugins option.
This will take you to the section where you manage the plugins you download and install on your site, type Yoast SEO in the search bar and start the search.
The plugin will appear there first, where it almost always is thanks to its incredible fame in the WordPress community.
Then you will only have to click on Download, and once it has downloaded, you will have to press the Activate option, so that it will start working properly.
And at this point we come to what we are interested in, how to configure Yoast SEO.
Basic settings
General Tab
With the plugin already active, you will see that now a Yoast SEO button appears in the Settings section of your WordPress user panel. This button displays even more options, the first of all is General, let’s start with it.
In this section Yoast informs you details related to the SEO of your site, and gives you the possibility to configure elements related to the operation of the plugin itself.
This is where you will see the indispensable Setup Wizard, it is designed to guide you through the basic configuration of your Yoast.
The installation wizard is the best way to adjust your Yoast if you are not familiar with this plugin or WordPress in general.
When you finish all the steps of the Setup Wizard your Yoast will be fully configured, albeit in a standard way. If you want to configure specific elements, you’ll have to take a look at each section of the plugin, and that’s just what we’re going to do.
Characteristics tab
In this tab you enable the modules you are interested in using from the plugin.
- SEO analysis: a feature designed to help you optimize your content when you create it.
- Readability: the function with which Yoast checks the readability of your texts, which translates into a better user experience.
- Essential content: if you have essential content or work with pillar pages, this feature will come in handy.
- Link counter: with this module active Yoast will count the amount of links pointing to your article, and the amount of outgoing links.
- XML Sitemaps: create your sitemap easily with Yoast by activating this module.
- Advanced settings page: the module you are interested in if you want to configure more precisely the technical aspects of your site’s SEO.
Appearance in the search engine
In this tab you can configure a set of aspects that will play a key role in the success and positioning of your site, and that is the appearance of your website and its content in search engines.
In the general section of this tab, you can configure elements such as the title of your site, the title tag and the meta description of your home page.
You can define whether your title tags, or SEO titles, as Yoast calls them; have any special characters by default; and also set what kind of meta description it will place by default in case you don’t set it personally when you create a new post or page.
Moreover, you can create custom templates for each type of content and category.
By creating custom templates you will define how your content will appear in the SERPs depending on their types, which will save you a lot of time in setting up title tags and meta tags individually.
Social
In this tab you can manage the linking of your site with your social network profiles.
Here you can also configure the metadata of the different social networks so that your web links are displayed appropriately.
Webmaster Tools tab
This is the tab where you configure the linking of your site with the webmaster tools of search engines such as Baidu, Yandex, Bing and Google, which in this case would be Google Search Console.
Advanced settings
At the end of your journey through the Setup Wizard and your passage through all the tabs we have talked about you may want to take a closer look at some of the things you have set up.
This is great, because there are aspects of your website that can benefit from more specific adjustments.
This is especially true for three crucial files on your website: the sitemap, robots.txt and .htaccess.
XML site map
About the sitemap, or sitemap, we told you that you could get it in the general tab. Although its default configuration is pretty good, it’s not a bad idea to take a second look at it.
Why is that? Because there is always a section or two on your site that you don’t want to index, and you need to configure this in the sitemap.
However, to edit it in depth you will have to go to the Appearance tab in the search engine, and manually choose which type of content you want to be indexed and which not.
Here it is especially necessary that you discourage search engines from indexing pagination files, such as those generated by feeds when they have many posts, for example. Google may interpret page two, three or four of your blog as duplicate content.
You can also prevent specific taxonomies, category pages, or particular pages and posts, such as privacy policy or cookie policy, from being indexed.
Robot.txt
With this file you can clarify which sections of your website you want Google spiders and other search engines to crawl, and prevent them from adding and indexing particular sections.
This is especially necessary to prevent Google from crawling, for example, the sections of your website that correspond to the administration of the site itself.
.htaccess file
Editing the .htaccess file can be a bit risky if you are just starting out with WordPress, but it is often very convenient to manage certain types of redirects or to manage some more technical aspects that can have an impact on the overall performance of your site, its loading speed and the user experience it provides.
How to use Yoast SEO?
When using Yoast SEO there are two approaches, one that has to do with the optimizations you make on your site at a general level; which affects your site as a whole; and at a specific level, with improvements it proposes to you when creating content, such as pages and posts.
At a general level
In this sense you can use Yoast SEO to work on the way your content is indexed, its appearance in search results, the linking of your site with tools that can be useful to you and the microdata and Schema it uses by default.
All this can be managed in the sections mentioned above.
Individually, in pages and posts
Individually, you can employ Yoast to optimize your content, in this case when creating pages and posts Yoast adds a recommendation box in the sidebar of the WordPress post and page editor.
The recommendations have two sections: SEO and Readability.
In relation to SEO look at how many times you repeat the keyword, its prominence, that you use it in key segments of your content; take into account your internal linking strategy, and if you point to a valuable site that has to do with the topic you address.
This section should always be taken as a recommendation, not as a guide to be followed with blind faith.
As for the Readability section, check that your content is simple and easy to read, that you don’t write in very long paragraphs or use words that are too complicated. It can help you to create content that is very reader-friendly, scannable and light.
When it comes to SEO, Yoast makes your job a lot easier, and this is something it has been able to deliver on both a general and specific level in a way that few SEO plugins have been able to match.

Get 10% extra credit for your Link Building
Use the coupon WELCOME10 on your first recharge and get powerful links in newspapers and blogs of your topic. We have +20.000 digital media.
Yoast SEO Premium: Is it worth paying for?
But everything we have mentioned covers only modules and functionalities of the free version of Yoast.
The premium version of Yoast SEO includes even more features, more powerful and extensive, and much more specific.
From redirects, related keyword suggestions, interlinking recommendations, to additions to the readability section to further improve the quality of your texts.
While some of this functionality can be had for free with other plugins, if you want to put it all together in one plugin that does it all beautifully, few options will be better than Yoast SEO.
What about you, which WordPress SEO plugin do you prefer? Did you marry Yoast SEO to work on the SEO on Page of your site or have you opted for its alternatives?

Author: Otto F. González
Do you need help with your SEO and branded content strategy?
In Linkatomic we offer you 20.000 newspapers and blogs to improve your visibility on the internet.


