How to create a blog on wordPress, step by step
Learn how to create a blog in wordpress easily and without suffering using the most powerful CMS (content management system) that exists. If you are thinking about creating a website or blog, even an online store, you have come to the right post.
You’ve probably already heard about WordPress and have read a lot about the countless features and resources that this free content management system can offer to our online portal. Let’s get started!
Requirements to create a WordPress blog
We only need to hire a basic hosting and a domain. We are going to explain step by step how to create a very professional wordpress blog spending as little money as possible.
It is true that it is possible to create a free blog from the WordPress platform, the problem with these blogs is that they are very limited, so we are going to discard this option. Therefore, we are going to buy our own domain and hire a basic hosting to create a quality blog, the investment is minimal!
Choose your own domain
The domain is the address that will allow your visitors to locate and enter your site. There are domains with all kinds of extensions: yourdomain.com, yourdomain.net, yourdomain.org …
In Godaddy we can check the availability of domains and register the perfect domain for our website. They are very safe companies to register domains. Here I will explain how to find and register a domain for your website.
📅 Domains are paid annually. They usually cost between 10 and 20 euros per year.
Hire a good hosting
The hosting will allow us to upload our WordPress and files to the cloud.
Hosting is contracted according to the space and bandwidth consumed by your site. The more visitors your website receives, the more bandwidth it will consume.
There are many companies where to see and hire hosting plans, from basic packs to virtual and dedicated servers to host several web pages.
Which web hosting to hire?
As we are starting to create our first blog, it will be enough to hire a basic hosting. It would be interesting to hire a WordPress hosting with technical support and backup. Take a look at this post where we show you how to hire a web hosting.
Once we have the hosting we are going to use for our blog and our own domain, we are going to install wordpress in our web hosting.
How to install WordPress easily
The easiest way to install WordPress on our server, is through the WordPress Manager application that we will find inside our Cpanel.
We are going to use WordPress Manager from Cpanel. We click on New Site and in the Install tab we will only have to add:
- Installation URL: By default, the url will be domain.com/wordpress but we can delete this folder to create WordPress in the root of the domain.
- Admin User: This will be the user with which we will access our administration panel.
- Admin Password: It will be the password to access the panel, we recommend using the password generator to provide greater security to our website.
- Email: In case of losing our password we will be able to recover it through this email.
We can also touch additional options such as:
- Prefix for the tables in the database. We can leave it as it comes. The default prefix will be wp.
- The name and description of the blog, which we can modify later.
Then click on Install to start the installation of our WordPress blog on our server. Easy, isn’t it?
To uninstall WordPress we will only have to click on the Uninstall tab and delete our blog. This option is irreversible and you will lose all the content you have.
Basic WordPress configuration
We have already installed WordPress on our server and now we can access with our login data to the administration panel from yourdomain.com/wp-admin/ .
To begin with, let’s set up a few basic things.
- Settings ” General: Change the site language to Spanish.
- Settings ” Permanent links: Check the option Name of the entry
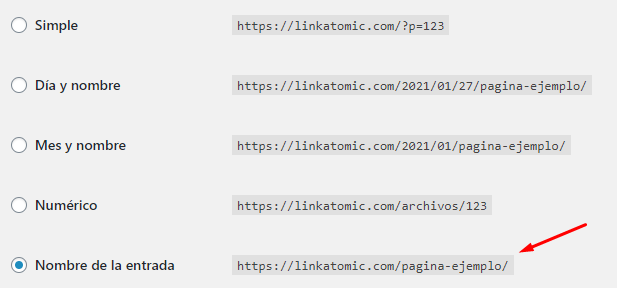
If you go through the WordPress settings (General, Writing, Reading, Comments, Media, Permalinks…) you will see that you have numerous options to configure and customize to your liking.
Installing an SSL certificate to make your blog work as a secure site is very important for SEO. Learn in this post how to activate https for free in WordPress.
Categories in WordPress
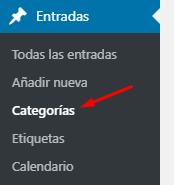
In Entries > Categories, we can create new categories to organize the posts.
- Name: The name that the category will receive within the blog.
- Slug: It will be the name that will receive the url of the category.
- Top category: If you want to group a category within another one.
- Description: Some WordPress themes show the description.
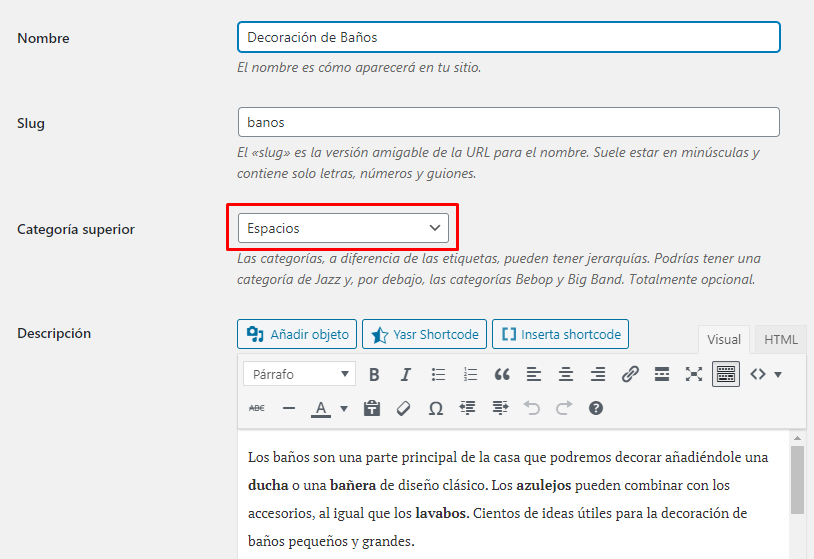
The URLs of the categories of a interior design blog will have structures similar to these:
- decoraciondesalas.com/spaces/kitchens/
- decoraciondesalas.com/spaces/bathrooms/
The categories in WordPress allow us to create different levels of depth and hierarchies. For example, we could create the category Europe, within Travel.
Tags in WordPress
Under Posts > Tags we can add new tags to group blog content in a similar way to categories. Tags for a travel blog could have URLs in the following style:
- miblogdeviajes.com/etiqueta/coliseo-romano
- miblogdeviajes.com/etiquette/torre-eiffel
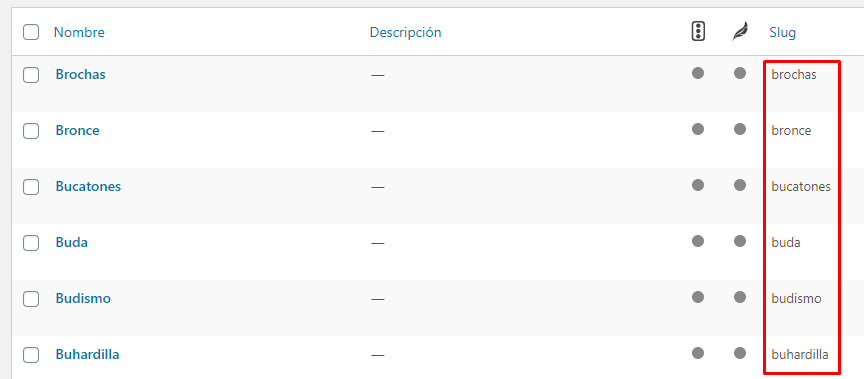
We can create numerous tags to group our contents, as we publish entries.
🔖 Unlike categories, tags do not allow you to group folders by depth levels. We can also modify the base label.
Add WP posts
Create them from Posts > Add new. Posts are public posts and content that you will display to your blog visitors. Here you can write articles, assign categories, tags and upload images.
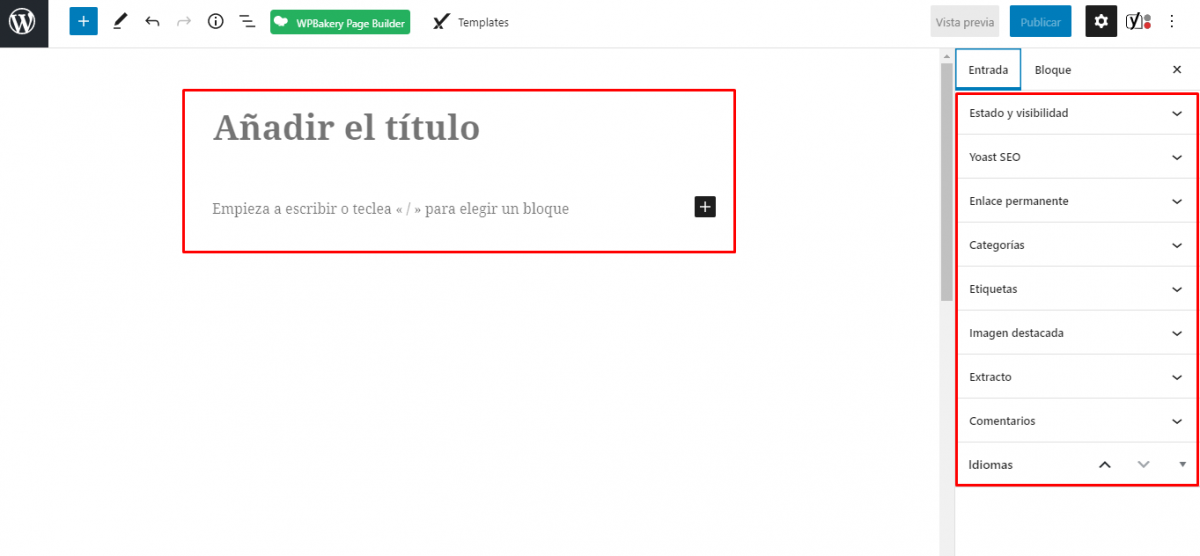
Publishing a post in WordPress is simple and not too mysterious. Check out this post if you need ideas on how to write a good article on your blog.
Themes for WordPress
We have just created a blog in WordPress and now we are going to choose a theme that we like for our website. The themes are the design, the aesthetic and graphic part that the users of the blog will see.
The themes that come by default in WordPress are quite simple, so we will have to choose a nice theme that our users will love but that loads fast and allows the visitor to navigate comfortably through the web.
It is important to know that if Google likes us, it will position us well in its search results and we will get visitors. Learn here how to improve the SEO on page of a blog.
If later we want to monetize a blog with advertising banners, the more visits our blog has, the more clicks will be made on our ads, so we will generate income with a blog.
In short, the more visits we have, the more clicks will be made on advertising and the more money we will earn. In addition, you can charge for selling sponsored posts, which is also another form of monetization.
The loading speed of web pages is a very important factor for search engine optimization. It is crucial that our theme loads fast.
Buy a paid theme or use a free one
Now that we know this, let’s choose a fast and beautiful wordpress theme, so we have two options: Use a free theme or buy a paid theme. Both options can be useful but a paid theme can have many attractive features.
How to install a free theme for a Worpress blog
Inside the WordPress administration panel we have the section Appearance > Themes. If we look in Popular we will find a list with the most used and downloaded themes. We are going to use the Theme Basic, you can use the search engine to find it.

Click on Install, then Activate.
Professional paid themes for WordPress
There are many pages of paid templates and themes for WordPress.
Themeforest is one of our favorite sites. If you find a design you like, you can buy it, download it and install it in WordPress. If not, you can always use a free theme.
How to create and add menus in WordPress
The navigation menu is one of the most important parts of your blog as it allows users to navigate between the different sections. You have to be very clear about how you are going to organize your menu so that the user’s experience when navigating your page is simple.
To create your first menu in WordPress you must go to Appearance ” Menus, within the administration of your WordPress. From this screen you will be able to create and organize your menu, as well as manage the location.
If after installing the theme it already has a defined menu you can edit it directly, if not, you will have to create a new one. To do this click on “Create a new menu“, a screen will appear where you will have to define the name of the menu, for example, “Main menu“.
Now that you have the menu created it is time to add the content you want to display. You can add different types of content to the menu: Pages, posts, custom links and categories.
On the left side of the screen you can browse through these types of content and add the ones you are most interested in to the navigation menu.
For example, you can add the Home page, the main categories of your blog and the contact page.
You can then select where you want this menu to be displayed. By default, most themes come with several zones defined, although the most common ones are: header and footer.
It is best that your header menu is the one you use to browse the web and in the footer you create another menu with the pages of legal conditions, privacy policy and legal notice as these will be present but are not of interest to the user.
WordPress Widgets What is this?
What are WordPress widgets? Basically they are small modules that are already defined and fulfill a function such as displaying categories, displaying a search box, social networking buttons, etc..
WordPress by default has several very interesting widgets like the ones we have discussed, also, depending on the theme you have chosen you may find that it has additional widgets that can display the most popular posts, the latest instagram posts or tweets from your twitter account.
To manage widgets in WordPress, inside the administration desktop you should go to the Appearance » Widgets.
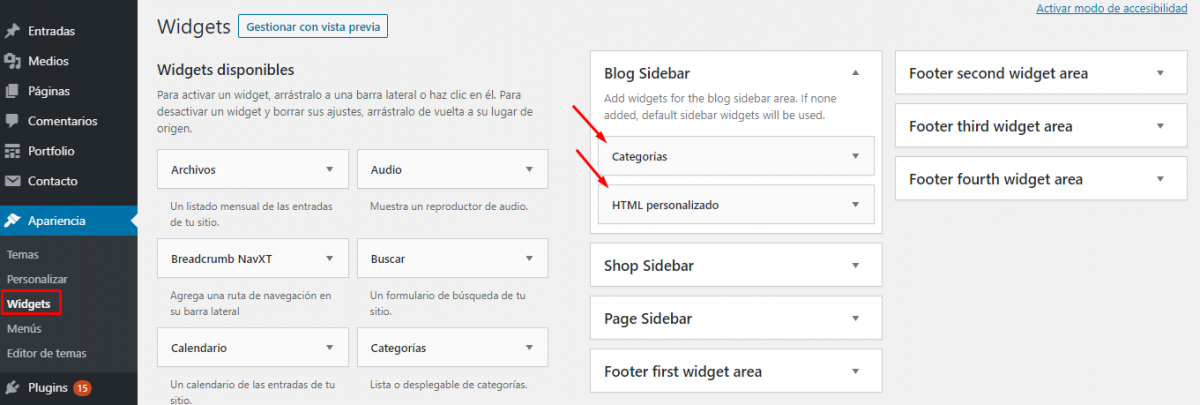
Here you will find both the available widgets and the areas where you can display them. The areas are the zones where you can display different widgets. Most commonly you will find a common area called “Sidebar” or “Sidebar“, which will be the space (on the right or left) next to your main content.
To display a widget in a certain area just drag the widget (from the left side) to the area where you want it to be displayed. We recommend the following widgets to be displayed in the sidebar: Search, categories and recent entries.
This way, the user will be able to browse your site and search wherever they are on the page without having to go to the home page to find the last thing you have published, improving the user experience and the time spent on your site.
Basic plugins for WordPress
WordPress plugins are extensions that allow us to add new features to our website or blog.
Using too many plugins could slow down your site. It is essential that you install and use only the plugins that you are really going to use and that you discard the plugins that are not essential for the functioning of your blog.
We have created a list of recommended plugins that you should install on your WordPress:
- Yoast SEO (SEO Plugin)
- Google XML Sitemaps (SEO Plugin)
- Contact Form 7 (Contact Form)
- Autoptimize (Loading speed)
- Shortcodes Ultimate (Design)
These are the plugins for wordpress that we have considered basic and fundamental but there are many interesting plugins that can be useful. We recommend you to take a look at this post to discover the best plugins for WordPress. Do not miss them.

Get 10% extra credit for your Link Building
Use the coupon WELCOME10 on your first recharge and get powerful links in newspapers and blogs of your topic. We have +20.000 digital media.
Do you need help with your SEO and branded content strategy?
In Linkatomic we offer you 20.000 newspapers and blogs to improve your visibility on the internet.
